"Moonbase" Website Layout – Page 1 of 2
This tutorial shows how to make a starkly lit sandy website template, with a menu of blue buttons. This tutorial was created in Photoshop CS4.
1 – Creating the structure of the page
Click File > New. Enter a Width of around 700, and a Height of around 500. Press OK.
Set your foreground colour to brown. (I've used 5A2A00 here.)
![]() Select the Pen Tool. Make sure the little Shape Layers icon at the top left of the screen is clicked. Click the Pen Tool to draw a triangle, as shown. (Remember to finish on the same point you started on, to complete the loop.) You may need to maximise the window for this step, so you can see the points properly.
Select the Pen Tool. Make sure the little Shape Layers icon at the top left of the screen is clicked. Click the Pen Tool to draw a triangle, as shown. (Remember to finish on the same point you started on, to complete the loop.) You may need to maximise the window for this step, so you can see the points properly.

2 – Warping the path
![]() Ctrl+Click on the path, so that you can see the existing points, and then click on the path a few times, to add a few new points. (If you lose the selection of your path, you can always retrieve it from the Paths window. Click Window > Paths.) You can drag the points around, select them, or drag their "arms" around, by holding Ctrl while you do so.
Ctrl+Click on the path, so that you can see the existing points, and then click on the path a few times, to add a few new points. (If you lose the selection of your path, you can always retrieve it from the Paths window. Click Window > Paths.) You can drag the points around, select them, or drag their "arms" around, by holding Ctrl while you do so.
3 – Blending Options
Right-click this layer in the Layers window, and click Blending Options.
Drop Shadow
Bevel (Style: Inner Bevel)
Texture (Pattern: Beige with White Flecks [Click the sideways triangle if you can't see it. It's the second texture in Color Paper].)
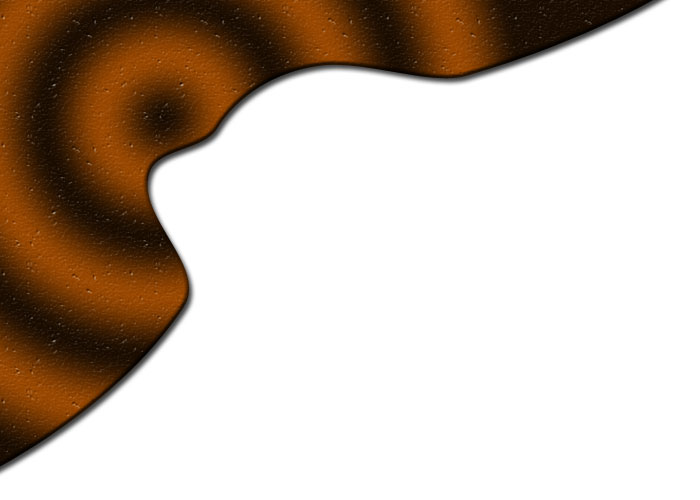
Gradient Overlay (Blend Mode: Overlay. Opacity: 70%. Style: Radial. Scale: 150%. Click the little picture of a gradient. Add "Color Stops" [the little tab shapes] along the bottom of the gradient. Put black Color Stops at 0%, 33%, 67%, and 100%. Put white stops half-way between them, at 17%, 50%, and 83%. You can drag the gradient around on your image, while you're doing this. Drag it so that its centre is towards the top left of your image, as shown. You may need to come back in here later, to drag the gradient around some more.)
![]() Choose the Move Tool. Press Shift+Up Arrow, then Shift+Left Arrow. This will move the brown area off the image a bit, so that the left and top bevels, and the "ends" of the Drop Shadow, aren't visible. (Holding Shift, while pressing the arrow key, causes the object to be "nudged" by ten pixels at a time, instead of one.)
Choose the Move Tool. Press Shift+Up Arrow, then Shift+Left Arrow. This will move the brown area off the image a bit, so that the left and top bevels, and the "ends" of the Drop Shadow, aren't visible. (Holding Shift, while pressing the arrow key, causes the object to be "nudged" by ten pixels at a time, instead of one.)

4 – Selecting the shapes of menu buttons
Click View > Show > Grid (or just press Ctrl+').
Click View > Snap (or just press Shift+Ctrl+;).
Click View > Snap To > Grid (if it's not already ticked.)
![]() Select four rectangular areas, as shown. Hold Shift each time you make a new rectangle, so that the previous selection doesn't disappear. When you select these rectangles, they'll extend into the white area.
Select four rectangular areas, as shown. Hold Shift each time you make a new rectangle, so that the previous selection doesn't disappear. When you select these rectangles, they'll extend into the white area.
Alt+Shift+Ctrl+Click on your brown Shape Layer, in the Layers window. This will trim the ends of the rectangles off.


0 comments: